Tuesday 14 April 2015

Knock Knock...

Who goes there!
The idea to make a door knocker just came into my brain one day. I thought it'd just be cool to have one on my bedroom door, maybe this would kid me into thinking I had my own apartment or something. Hahaha, like that's ever gona happen....


I really don't know where the idea had come from but it was after I'd thought about it that I remembered those funny ones from Labyrinth. I'd seen that film a million times in primary school and it must have subconsciously helped shape my idea of what a door knocker should look like. 


I started sculpying with my Sculpey until a sort of face happened. I left gaps in the lower lips for the knocker to sit in. I'd stuffed the back of the head with a wad of kitchen foil in order to save using all my precious Sculpey, because I'm very poor and buying Sculpey hurts me a bit.

Why I'd want anything this creepy in my bedroom is anyones guess

Due to over-enthusiasm and a lack of planning he has ended up looking like a close relation to Dobby the House Elf. But no matter, some leaves'll probably help!  


Yeah, that's a bit better. I had both very thin parts in the leaves and very thick parts in the face so I kept a very close eye on him while he was cooking and took him out when I was starting to worry about the ends of the leaves. 


I gave the whole thing a few coats of black acrylic paint, using a brush to get into every crevice and a sponge to even out the coating and add a bit of texture.


I'd imagined him to be bronze but I only had gold or silver paint. C'est la vie. But I think that actually the fates knew better because the gold turned out looking pretty good. I used only a very small amount of gold paint at a time, sponging it on evenly until I thought I had a good balance between dark in the nooks and metallic on the surfaces. 

I'll definitely have a crack at doing another one or two because he really hadn't taken me very long, just two afternoons in fact! And it'd be cool if I could figure out how to make it a functioning knocker rather than just ornamental.

Thursday 9 October 2014

Stop-Motion Project- The Blue One

  I thought it'd be nice if Goth mermaid had a friend to interact with. 


  Goth mermaids been having around on my desk for a little while now and you know how the more you look at something you've made the more flaws you see in it over time? Well, the new mermaid gave me the opportunity to improve upon a lot of the things that had began to niggle at me about Goth. Because Goth was unplanned, she wasn't really initially built to animate so a main difference between the two is that Blue mermaid is able to speak. 


Also, in stark contrast to the Goth's manic, unrelenting grin, Blue has an air of melancholy to her...blue on the outside and on the inside :(. However, she does has four different mouths so she is at least able to express her upset. Here she is having a grumble to Gothy:


She took me about a day to make. Her head is small and round and her hips are wide and flat. Her pupils are small detachable painted plasticine disks, rather than painted onto the eyeball itself and popping the whole thing out from the back of her head. I'm not sure if this is necessarily a better method though, just different.  


Most of all, I wanted to create a more interesting body shape for Blue as Goth has the figure of a Barbie and enviable as that may be, a few more lumps and bumps make for a much more characterful shape I reckon. So Blue has a lovely muffin top and sizeable, unbridled boobs. 


Her hair is made from plaited blue/grey raffia which is a nice matt contrast to Goth's shiny angelina fibre hair. I think Blue is a bit wary of Goth. Who can blame her though...


I had been finding the bright white of Goth's skin a bit of an issue to photograph and film because she always looks so overexposed and the details of her face get a bit lost. So I suppose that's why Blue ended up....blue. I also used a sponging technique to highlight her skin to make her look a bit etherial or alien- which I think has worked well.


Tuesday 17 June 2014

Stop-Motion Project- The Boy

 I thought it would be more interesting to add another character to the animation. Below is a brief sketch of what i had in my head. He is just a gormless boy bobbing along in the pool and somehow he's managed to squeeze his chubby physique into his tiny rubber ring. I wanted him to look gormless with unblinking staring eyes. 


Working from my sketch, I modelled him up in plasticine and when I was finished lovingly sculpting his little man boobs this is how he ended up looking. I've painted his skin in bright white, although I'm not sure if this will cause me some exposure problems later on.


I thought it would be good if he was to slowly turn in the pool as he bobbed along, keeping his eyes always, unblinkingly, on the mermaid. Therefore I  had to make him a complete head since all 360 degrees of him would be seen- rather than a hollow one like the mermaid's. I had a bit of a try at making the back of the head detachable since this would allow me to move the eyes around inside of the head between frames. It wasnt really working though, it wasn't subtle enough.


Then, after spending rather a long time on this futile attempt I had the brainwave to simply make the pupils detachable. Jeeeeeeeeeezzz! They're made from tiny dried black chips of paint -an absolute bugger to put in place and needless to say a nightmare if you drop one! I'm not sure how they're sticking on...they just are and it's working well enough.


He's very little in comparison to the mermaid- just 12cm tall, but he'll be more in the foreground so I think it'll work out ok. His mouth is just cut out from paper and stuck with a tiny bit of blu tack. I was testing out different mouths so didnt want to commit to anything by painting it directly on and this way if I decide to animate his mouth at a later stage I still can.


I defined his eyes a bit more by surrounding them with grey and now it's all starting to look a bit Tim Burtony but I think that's ok. Here are a few close-ups where he looks like hes seen some terrible terrible things...

So, since I wanted it to look as if he was bobbing along on the waters surface in his rubber ring I needed to come up with a device to allow him to move in such a way. I came up with a rectangular tube with a ping pong ball sitting on top. It's not a very secure solution but it works. However, due to this precarious mechanism I have dropped him several times and he has suffered a few casualties and has had to endure a couple of trips to A&E to receive hair and ear transplants and a nose job. He's a tough cookie though considering he's only plasticine (one of the most malleable materials I can even think of!) and only really has a few remaining dents and imperfections. From now on I will endeavour to be less violent towards him, he really hasn't done anything to deserve it and it would be tragic if i lost him.
  Behold, the ingenious invention. The ping pong ball just sits inside the cardboard circles and it all just sort of balances on top of each other.


Just a little detail im adding is the seagull in the background to just fly across the sky a bit. Seagull is just simply a body with 2 sets of detachable wings: one for flapping up and one for flapping down which I alternate between frames as well as shuffling him along a bit.


You can see him flitting across the sky in this little video:


And this video shows my first attempt at filming with the boy. He absolutely zooms across the water on a fast current rather than gently bobbing along so next time I know to move him and the water a lot slower from frame to frame.


Sunday 15 June 2014

Stop-Motion Project- The Mermaid

So I've been working on this in my free time for a little while now, I'm in the process of making a little animation. It's not something I've done before but I love to watch stop-motion and being a model-maker myself it was something I really wanted to have a go at. 
  I began by just messing about with plasticine, making different faces with different expressions and personalities because I'm not very experienced with making models of people, I've made quite a few rooms and buildings... but not many living things.


This pouty little man was my first little face. By the time I'd taken this photo I'd dropped him several times so he's a bit squishier than he once was. Despite this, I think he's done ok, I was quite happy with his overall expression - I think the large furrowed brows and mouth work well. I was thinking grumpy old man while making this one. This is the rest of the team:


This one was based on my own face


The shape of the smile and large square teeth were especially based on my own. I wasn't really expecting to make anything I was particularly happy with at this stage because I was only experimenting but after I'd painted this one I wanted to see if I could take it further...


Her eyes can pop out the back of her head so I'm able to move them around and have her looking in different directions. I painted her in monochrome because I was starting to think maybe I'd make her a bit gothy and maybe the animation could be mainly in black and white with hints of other colours.
  The body kept on growing and I decided I needed to make moving limbs, so I made these little wire arms which i covered in plasticine to enable them to bend and be moved (a basic armature I think)


Using the imotion app on my phone I began to play about with making her move, I made her do something flappy with her arms and blink a bit. She was starting to creep me out a little, something about all that relentless manic grinning... 


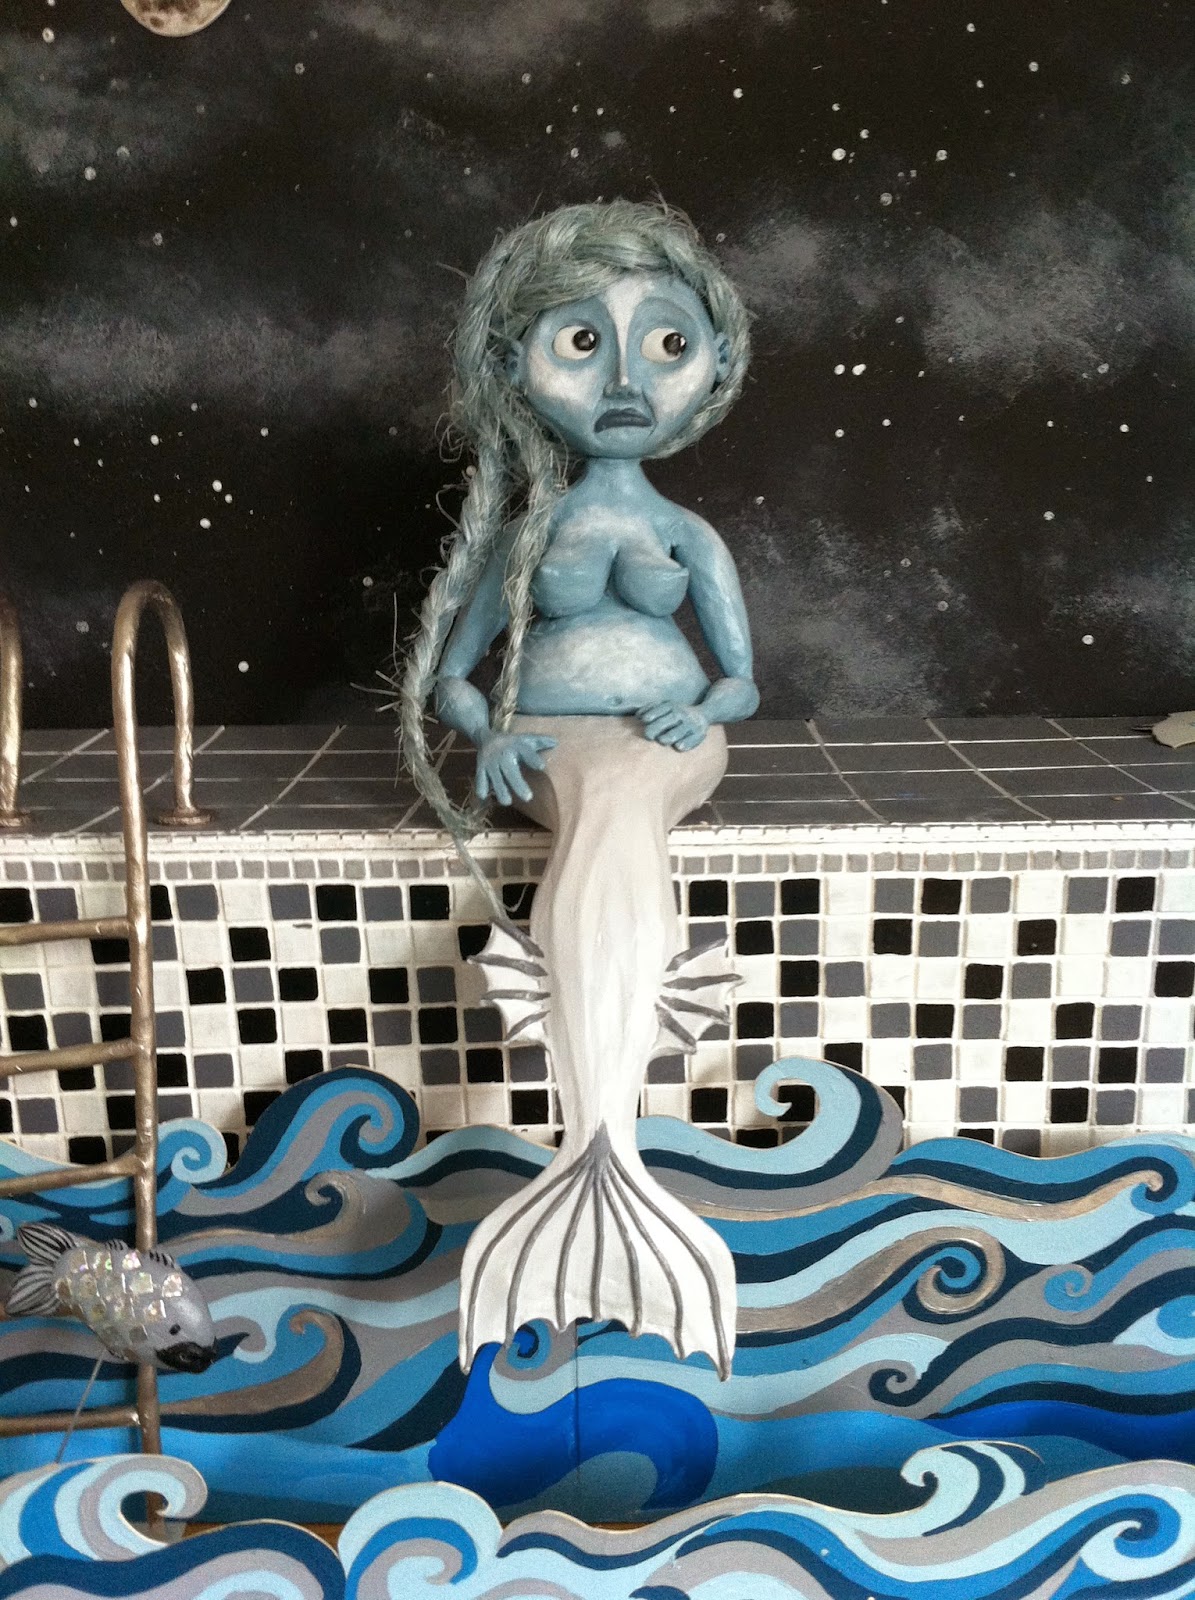
While making the legs it began to dawn on me more and more that they would not support the weight on the rest of her body so I avoided that issue and I fused them together and made a tail. The tail also has wire on the inside so that I'll be able to make it flip and curl. 


I was struck by the memory that I had angelina fibre somewhere in the house, I bought it about 5 years ago with no idea what to use it for, just because it was beautiful. I found my angelina fibre, I decapitated her and added more texturous, shiny hair...


  I hadn't really been planning anything, like what I was going to do next, it's all just unfolding in my head as I've been making.
  When the body was sculpted and painted I took her to the tattoo parlour for a heavy inking sesh. The tatts are sea themed so she's got jellyfish, a seahorse, a large ship and an arrangement of tentacles, seaweed and a ships wheel on her chest.


 She's sitting at an outdoor pool in the night time. For which, I painstakingly sat and cut out a million tiny cardboard tiles which I then stuck side by side and individually painted for the pool side. This is what I like to do with my free time. The idea that was forming in my head was to make my animation like a moving image (well duh)...but I mean like as if it was a painting in Harry Potter- subtle movements rather than maybe an actual storyline. Like blinking, flicking of the hair etc. etc.


There she is, having a sit. And then I bought her to life again, oh the power! I think this little video is about 40 frames or so and took me maybe 20-30 minutes. I broke the ladder half way through. Although unintentional I think it's nice how the light flickers like an old movie, its been put through an instagram filter which has given it a nice tint. I blew on her hair a bit between frames to try and make it look a little breezy by the pool...it's all in the details.


Whats next? I'm going to have a think about expanding on my idea. Perhaps adding more characters...

Thursday 30 January 2014

Kung Hei Fat Choy

Yay! It's the second New Year this year!

Happy Chinese New Year's Eve! I'm excited to go and see the parade in London at the weekend. I've never before celebrated chinese new year but I think actually if there's a chance to celebrate something then you should probably take it, I think the Google homepage shares this philosophy. Especially in January- that's when people need a big old knees up the most. 2014 will be the year of the Horse and the internet has told me that this means: 
"For those born on the year of the horse...it is believed they will offend Taisui, the god in charge of fortune, so their finances may fluctuate. In terms of career, it is advised to keep the peace between colleagues. For those not born on a horse year, the year ahead will bring health and prosperity. It is said to be an excellent time to travel, as the next 12 months will bring good luck. You are advised to mingle with the locals, savour authentic cuisine and discover somewhere you have never been before."
While getting rather excitable about the festivities an idea struck and I set about trying to create something nice and wearable for Chinese New Year. This is what I came up with:
Chinese Lantern Earrings

Here they are- posing naturally in a woodland setting.

And this is how I made them...


I began by rolling out two balls of Fimo to the same size


And then proceeded to squidge them against a flat surface to create flat faces on the top and bottom, at this point they measured roughly 2cm in width and 1cm in length (I tend to use the squares on my cutting mat to indicate measurements). I used a thick needle to pierce a hole through the centre so they can be threaded onto the headpins and then used this same needle to press grooves into the Fimo, now they look a little like tiny pumpkins. 


I made four flat disks and pierced a hole through the centre of each, these are shaped to be about the same size as the two flat surfaces of the red beads. Then cook um! I think about 110degs for about 25mins should do it.


Using gold paint and an ultra thin brush then paint strokes of gold into the grooves. I also painted the little disk beads gold.


When the paint has dried thread the beads onto a headpin so that the red one is sandwiched in between the gold disks. Then cut and curl the wire to finish.


To make the tiny tassels I used red embroidery thread and, pinching it between my thumb and forefinger at the bottom and looping it around the pin maybe about 6 times or so. Then, using a length of the thread tied a double knot near the base. After this photo I trimmed the ends to make them even and attached the tassel loop to a jump ring which could then be fixed onto the bottom of the other beads. Add earring hooks, et voila!


This is how the finished earrings look on. They're very light and wearable but also bright enough to make a reasonable impact I'd say!


Directly after finishing the red pair I went on to make six more pairs in varying colours. I even had this chinese character card lying around for years which I had no idea when I was ever going to find a use for it, but I think it's pretty much perfect for these earring cards.
  I'd been supposed to allocate myself 2 hours of craft time but eight pairs of earrings later it it was already 8pm and I'd finished the entire series of Orange Is the New Black - Oops! (...I regret nothing.) As always I'd love to hear your feedback and comments in the box below! :)

Wednesday 25 September 2013

Irrelevant.

Fine. I admit it, recently there has been less jewellery making and selling and more pokemon making...and battling.

And no, I'm not embarrassed. 

I've also partaken in a bit of this:

Many a happy hour was spend on Lego Lord of the Rings

But it's not all been fun and games, I've had a cold for about a week, and so there's been a fair bit of this:

In bed. Not sure if that's clear...

But casting my mind back to a time when I did something a bit more productive...earlier this month I had another shared market stall, this time at the Muswell Hill Festival and (profit wise) it was painfully unsuccessful. At around 4pm we decided to pack up and call it a day. I'd made two sales in four hours, the crowds were dying down and just as we got in the car the second downpour of the day set in- good timing! The thing is, we'd all anticipated the day to be so much more successful than it was, there were plenty of people there, lots going on, a range of stalls, entertainments and apart from a short downpour around lunchtime the sun did make an appearance.

 Sorry, this was in fact the best pic I took all day

I was a bit disappointed, mostly, considering the bleak state of my finances at the moment. Even so, I maintain that it was still worth doing I think you learn something from every experience you get yourself into whether it was a positive, negative or even just a 'bleh' kind of experience. And even if you can't tell what it was exactly you got from it, I still think some useful little tidbit will have been stashed away in the back of your mind for future use. One thing I do know I took from the day was £16 which I didn't have before. But, if any stallholders happen to be reading this, I'd love to hear your perspective on disappointing market days: theories? Anecdotes?   

Hoping for a bit more luck this time, my mum and her friends have kindly volunteered to mind my stall, while I gallivant off to SARDINIA. So fear not, Fauves will once again be there at the Hitchin Craft and Farmers market on Saturday 28th September